Opt-In Subscriber List (VIDEO)

Instead of updating your subscriber lists periodically yourself, you can choose often a more convenient option of using CO-SENDER provided subscriber sign up form. In this case when someone fills out and submits the form, his or her data will be added to your chosen subscriber list automatically.

Opt-In_Subscriber_List

Read more on Opt-In Subscriber Lists.

Check out more Video Tutorials!


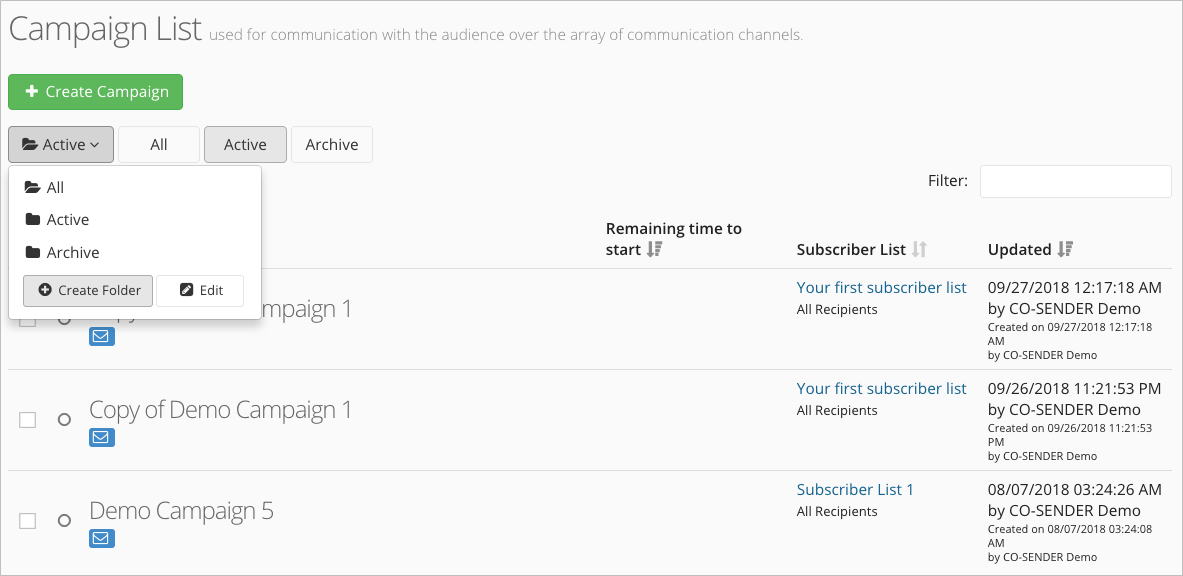
Organizing Campaigns Into Folders

In CO-SENDER you can create, rename, or delete folders to keep your campaigns organized in a way that makes sense to you.

Folders2
  1. Navigate to Campaigns.
  2. Click on the “Active” folder button on the top left to reveal the drop-down menu.
  3. Click “Create folder” button.
  4. Give your folder a name and confirm this by clicking “Create” button.
  5. Done! You can find the newly created folder among your other folders.

Did you misspell the folder name? Don’t worry, it’s very easy to change any folder name, just repeat the first two steps above and click on “Edit” button instead. Now simply click on the edit pencil symbol next to a folder and rename it. You can also delete the folder by clicking on the bin symbol instead.


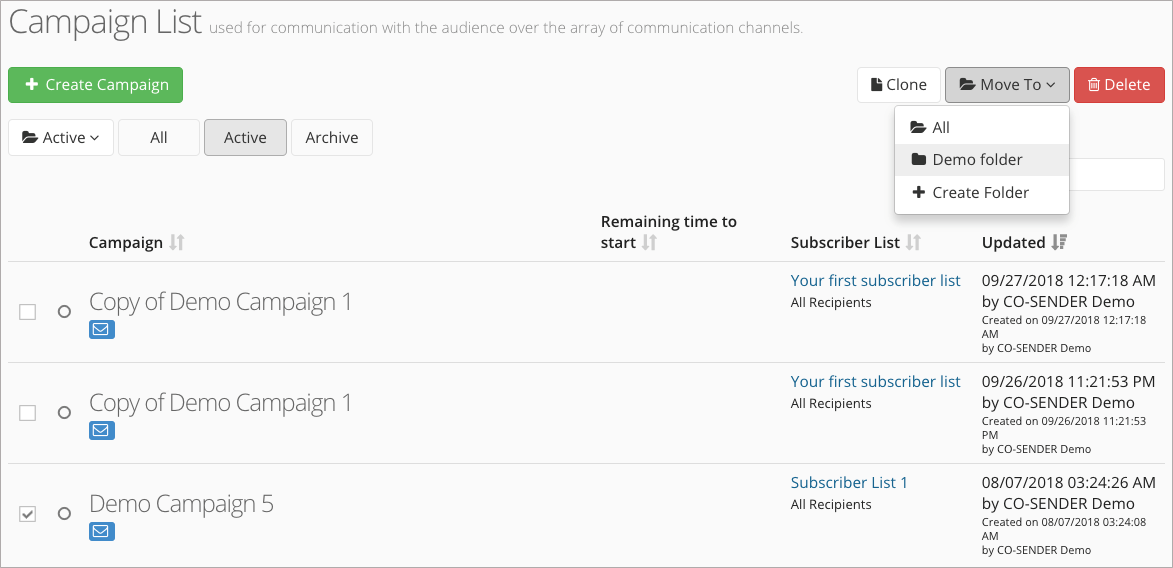
To move your campaign to a desired folder follow the following steps:

  1. Navigate to Campaigns and find the campaign you want to move.
  2. Select the check-box next to it.
  3. Click “Move To” button on the top right and select the folder from the drop-down menu where you want to move your campaign.
  4. Done! The campaign was moved to your chosen folder.
Move_to_Folder (1)

Please note that you can select and move multiple campaigns simultaneously. Also note that when you move campaigns into separate folders, your Reports window will still show the full campaign list.


Cloning and Deleting Campaigns

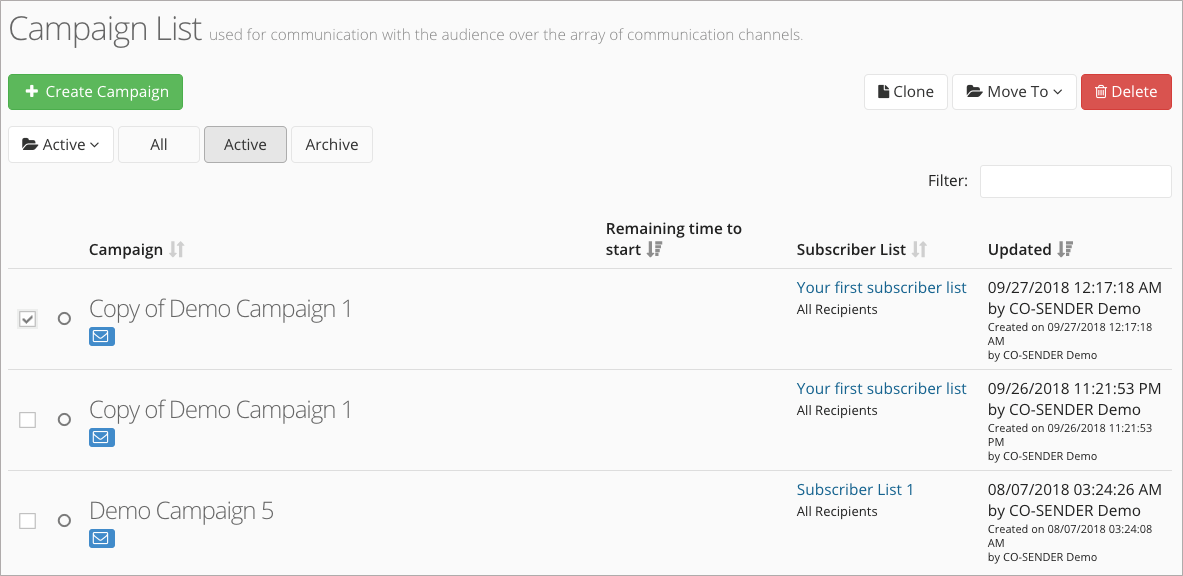
Do you have a great campaign that you would like to use as a template when creating another email campaign? With CO-SENDER it’s very easy to clone any existing campaign with all its contents and settings!

Cloning
  1. Navigate to Campaigns and find the campaign you want to clone.
  2. Select the check-box next to it.
  3. Click “Clone” button on the top right.
  4. Enter a name for the cloned campaign and confirm this by clicking “Clone”.
  5. Done! You can find your cloned campaign among your other active campaigns.

In the same way you can delete a draft campaign from your campaign list. For this purpose click on “Delete” button, after you clicked in the check-box. Note however that only campaigns with “Draft” campaign status can be deleted, as campaigns with any other status won’t be allowed to delete.


Permission Reminder

Permission reminder is a short message in an email that reminds the recipients why they are receiving your email and how did they join your list.

Understanding Permission Reminder

One of the required fields to fill in when creating a Subscriber List is a Permission Reminder. What is it and why it’s required at all?

A permission reminder is a short message in an email that reminds the recipients why they are receiving your email and how did they join your list. Permission reminder helps you to comply with Anti-Spam laws, establish a positive brand image, reduce spam complaints and unsubscribes, while at the same time keeping your email reputation and deliverability high.

Note that permission reminder must contain the name of the company or brand, website, event where the person has subscribed, or to remind and explain the person in some other way how the subscriber got on you subscriber list (such as over the phone, product purchase, opted-in when downloaded some materials etc.).

For example:

“You are are receiving this email because you subscribed on our ‘XYZ’ website.”

“You are are receiving this email because you subscribed on our website to our ‘XYZ’ newsletter.”

“You are receiving this email because you are customer of ‘XYZ’ Company.”

“You are receiving this email because you agreed to receive newsletters from “XYZ” company over a phone conversation.”

Please make sure that all your subscriber lists and Email campaigns include appropriate permission reminder, as otherwise CO-SENDER may reject your campaigns and they will not be sent out.


Pre-registration for SMS Campaigns

Many mobile network operators worldwide are requiring that you pre-register your Sender Name, and other information (such as message content or business name) when required, before sending bulk SMS campaigns. Therefore, to make sure that your Text Messages are delivered to your subscribers, we strongly recommend contacting us in advance in order to be registered and authorized with the operators.

You probably know that the Sender Name is what is displayed on recipient’s phone to show who the SMS is from. CO-SENDER supports dynamic Sender Name, meaning that any alphanumeric name is acceptable as long as it is set to any 3-15 digits or 3-11 characters in the range of a-z, A-Z, or 0-9 (any characters outside of this range may, or may not, be supported depending on the destination country and mobile operator). However, as already mentioned, there are different local, or mobile operator, restrictions in many countries worldwide that allow, for example, only numeric (such as USA, Canada), only alphabetic (such as Poland), or only alphanumeric (such as Austria) Sender Name values. Delivery of your text messages may fail in case your Sender Name doesn’t meet the requirements.

Moreover, each country and each mobile operator very often have their own very specific text messaging restrictions. Therefore it’s always wise to pre-register before sending a SMS campaign, as otherwise you are at very high risk that the messages will not be delivered to the handsets and you will still be stuck paying for them.

And though this is pretty obvious, it should be reminded that SMS spamming and spoofing is illegal, strictly forbidden and violates our Terms of Service. Mobile carriers always apply their anti-spam and anti-spoof filters which block messages following different criteria, such as Sender Name, message content, certain keywords, etc. Therefore again, just to be sure that your SMS information does not violate any of the above or some other specific regulations, please pre-register to avoid any disappointments when sending SMS campaigns.

To start the pre-registration, please contact CO-SENDER Support and provide your desired Sender Name as well as your messaging destination country.
 

Pre-registration for SMS Campaigns

Campaign Reports (VIDEO)

Always check your campaign reports for comprehensive analytics! Opens and clicks, open and click rate, click performance for each separate link – all are very important as they reflect your subscribers’ engagement with your message content.

Campaign_Reports2

Read more detailed information about Reports.

Check out more Video Tutorials!


Personalized Messages (VIDEO)

Personalize your messages to engage your subscribers and increase their loyalty! Insert any parameter from subscriber list to your message content, and it will be automatically filled in with your subscribers’ information when recipient receives your message.

PM_front2

Read more detailed information about Campaign Settings.

Check out more Video Tutorials!


Using Content Designer (VIDEO)

Use our drag and drop editor to create your message content incredibly easy! Add URL links to any element in your message. Upload images, edit them with in-built image editing tools.

CD_front2

Read more detailed information about Email Campaigns.

Check out more Video Tutorials!