Unsubscribing from Subscriber Lists

Whenever you want your subscribers to have a possibility to unsubscribe, you can add the “Unsubscribe” parameter to your emails. If a subscriber clicks on the unsubscribe link in his email, he will be redirected to a page where he will be presented with an option to unsubscribe from your subscribers list.

2016-06-02 14_42_12-CO-SENDER User Manual v.1.6.1.docx [Compatibility Mode] - Word

  1. From that point on, he will not receive any messages that are sent to him, even if his address is still on the list.
  2. In reports of campaigns, these subscribers will be shown as “Unsubscribed”.
  3. Once a subscriber has unsubscribed, he won’t be reachable by any user on the same account.
  4. Unsubscribing applies only for the subscriber list that was used to send the message, and an unsubscribed person will not receive messages sent to that list only; they will be marked red.
  5. If the same subscriber is on other lists that he has not unsubscribed from, he will receive messages sent to those lists.

Note that unsubscriptions will not be copied over to a new list when you clone a subscriber list.

Managing Add-ons


Click Here and watch Plans and Add-ons video tutorial


You can purchase add-ons by clicking on “Add-ons” in the main CO-SENDER menu at the top right.

  1. Add-ons will allow you to expand messaging allowance provided by your current plan, for an additional payment.
  2. After selecting and purchasing an add-on, information about it will be appended to your plan details, and your messaging allowance will be updated accordingly.
  3. Note that add-ons will be active only until the current period of your plan expires.
  4. Only an account administrator can purchase add-ons.
  5. Several different add-ons can be purchased with a single instant payment.
  6. Once your active plan expires, the new plan will not have any of your previous add-ons.
  7. Information about purchased add-ons can be found in your purchase history.


Understanding Regular Payments

CO-SENDER uses the pre-paid method, which means that a plan takes effect once you pay for it.

  1. Payments are performed regularly each month, on the same calendar day of the month.
  2. Purchasing a plan 3 days before the current plan’s deadline is recommended, in order to ensure the smooth execution of all campaigns planned in advance, in case of monetary transaction delays.
  3. Once a payment is received, an invoice will be sent to you.
  4. If a payment is not received on time, your plan will be changed to the Free version, and all your campaigns over the limits will be suspended.

You can check your historical payments, and when the next payment is due, in your purchase history.

Understanding Limits


Click Here and watch Plans and Add-ons video tutorial


Message allowance you have depends on the plan you are using, i.e. every plan has certain messaging limit included with the plan that you can use for sending email campaigns. You can also always increase your messaging limit simply by purchasing email or SMS Add-ons for your active plan, i.e. adding required number of messages to your current plan limits. Your remaining messaging capacity can be always conveniently seen on the Dashboard.

Plan limit scheduled

When you activate a campaign, your remaining messaging limit is reduced accordingly to the message quantity required for the campaign. Note that bounced or unsubscribed messages will not be returned to your messaging limit.

Limits can also be frozen. If, for example, you schedule a campaign for later start time, the number of messages necessary to complete this campaign will be deducted from your available messaging limit. Note that those messages are not sent yet, they are simply reserved for the scheduled future campaign, i.e. they are frozen. If you delete your scheduled campaign, all the reserved messages will be returned back to your available remaining messaging limit.

Understanding Plans


Click Here and watch Plans and Add-ons video tutorial


All CO-SENDER plans are of 1-month duration. Different plans are limited mainly only by the different number of email messages you can send, while all the plans include unlimited subscribers, unlimited users, option to send SMS, message personalization, real-time reporting, tracking, and other features. Any plan can be purchased, or upgraded to another paid plan, except the one that is already in use by the particular account. Note however that only account users with administrator rights can make these purchases.

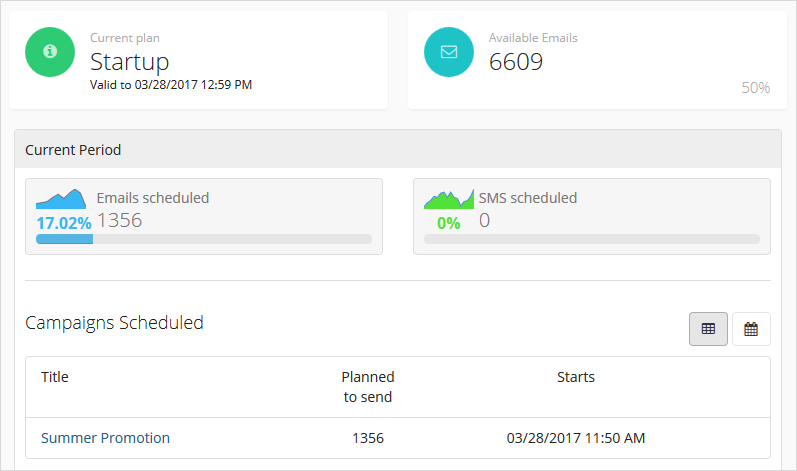
When you upgrade to a different Paid plan, it will take effect only after your active plan expires. Therefore, if you need to top up your active plan with additional messaging allowance for immediate use, before the new period or new plan kicks in, simply purchase Add-ons. You can always check information about your sending allowance for active and next plan on the Dashboard or in Account Settings.

Your monthly plan is renewed automatically on the same date every month. The exception is when you purchase a plan, for example, on the 30th or 31st day of the month, and the next month has less days then the previous one – in this case your plan will renew on the last day of the month.

    1. Once you create your account, you automatically get no-cost Free plan, which does not expire and you can use it free forever.
    2. If you purchase a plan while your current plan is the Free plan, your new plan will be activated instantly and will last for a month.
    3. Difference between the Free plan and other plans is that Free plan has the most limited messaging allowance, and there is CO-SENDER logo included in the footer with every email sent. If you want to remove CO-SENDER logo from your messages, you need to opt for a paid plan.

CO-SENDER reklama

  1. You can purchase a new plan up to one month in advance, and it will be activated as soon as your current active plan ends. You can also purchase add-ons anytime to increase your current messaging allowance.

Using Account Activity Review

You can view your account activity report by going to “Account Settings” > “Activity Review” or, if you don’t have admin rights, by clicking on “Activity Review” at the bottom of “Current Period” section in the dashboard.

Activity review

Activity Review will display information for the time period you select. Information about your plan, its limits and message numbers used during that period will be displayed at the top of the window. You can move between the periods by clicking side arrows next to the period date.

Activity_Review

All campaigns activated during the selected period, will be listed at the bottom of the window. Campaigns where only Test Messages were sent, will not be displayed here. You can click on any of the campaigns and see detailed report about selected campaign.

Activating Campaigns

Campaign can be activated at the end of the campaign creation process: when you create a campaign, set all of the parameters according to your needs and press the “Activate” button. For a campaign to be activated, you must have a plan that is not expired and there have to be enough available messages left for your campaign. You can see your current plan and available message count on the dashboard.

Delivery details

If you are sending messages to a list of subscribers which contains subscribers with the same email address or phone number, such subscribers will be marked as identical and your message will only be sent once through the recurring channels. Identical subscribers found and delivery percentage will be presented to you in the pop up message.

Using Advanced Search

Advanced search is used to search through all subscribers and their campaigns. Just click “Search” in the main CO-SENDER menu, type at least 3 characters of the subscriber information in the search field, and a list of subscribers that have entries containing the information you typed in will appear. If you want to group subscribers by phone number or by their email address, just click on appropriate filter and subscribers will be grouped accordingly.

AdvancedSearch

Clicking on subscriber will display all of the campaign information this subscriber participated in, including information about delivery, opening and clicking for each campaign.

Advanced_Search2

To analyze subscriber’s data even further, and to help with data visualization, click histogram icon on the right. You will be presented with graphical representation of subscriber’s campaigns participation data, such as pie chart, histograms, and frequency graphs. Interactive graphics will help you to grasp and analyze the data quickly.

Subscriber Data visualization

Subscriber histograms

Exporting Campaign Reports


Click Here and watch Campaign Reports video tutorial


  1. You can always export finished campaign reports to your computer if you want. Just click on “Reports” in the main menu, choose the campaign you want to export, and then click “Export All” button; CSV file with campaign results will be downloaded to your computer. You can open this file in Microsoft Excel or any other spreadsheet program.
  2. Reports messages
  3. If you do not need all the information about campaign, just click on “Messages” and filter them according to the status of messages you need. Then proceed with exporting the report; it will include only the campaign data you have filtered.

Understanding Campaign Reports


Click Here and watch Campaign Reports video tutorial


You will see your reports listed in a report window like this:

campaign-report-1

Campaign reports show general information about finished campaigns.

Report, email

A/B test campaign reports look slightly different because they give you some additional information, including the results for both campaign versions.

Report Finished

A report includes:

  1. Channel used for sending campaign;
  2. Name of the subscriber list used;
  3. Number of planned to send messages;
  4. Campaign status;
  5. Start and Finish dates of the campaign.

Information about the campaign messages is conveniently displayed: Sent, Delivered, Failed, Opened, Clicked, Bounced, Unsubscribed, and the Click-Through Rate (CTR). Reports also show unique clicks and total clicks on your messages, as well as percentage of sent messages. Most of this data is also represented graphically for your convenience.

Report2017.08

GrafikasReport

You can view detailed report of every subscriber who participated in this campaign by clicking on “Messages” button in the top left and then selecting a subscriber you are interested in. Note that you can also view even more detailed results and performance of each and every subscriber by using advanced search.

There are also other useful campaign report features available:

  1. You can check a campaign message preview by clicking on “Preview” button.
  2. If you click on “Messages” button, you will be able to see to what addresses the messages were sent to.
  3. You can save a report on your computer by pressing “Export All”; a CSV file containing campaign information will be generated and downloaded to your computer.
  4. Report also includes some graphs that show a visualization of the fluctuation of messages sent over a certain period of time.
  5. Percentage of Unsubscribed users is counted from the number of Delivered messages.